I love organization. My pantry’s staples have see-through containers with chalk labels. My clothes are hung in order of short to long, each category of clothing in the order of the rainbow. A person I would love to meet is Martha Stewart because she taught me the right way to store sheets.
But when I began my 365 journey in 2015, I didn’t think my humble POTDs would require a system until I discovered the need the hard way. In 2017, I was inspired last-minute to sell a calendar of local scenes with an immovable deadline: Dec. 1. People seem to like having their calendars by January! It took me a week to sift, sometimes plow, through two years of photos, then edit them and finally design the calendar online. (Snapfish in case you’re wondering. Marvelous quality.) It was madness and I paid for it with rush shipping which ate into my meager profit margin.
By contrast, for Christmas 2022 I was able to design a calendar for gifts in about one hour. How? You guessed. Organization. Here’s what works for me and maybe will for you also.
SEE-THROUGH CONTAINERS AND CHALK LABELS
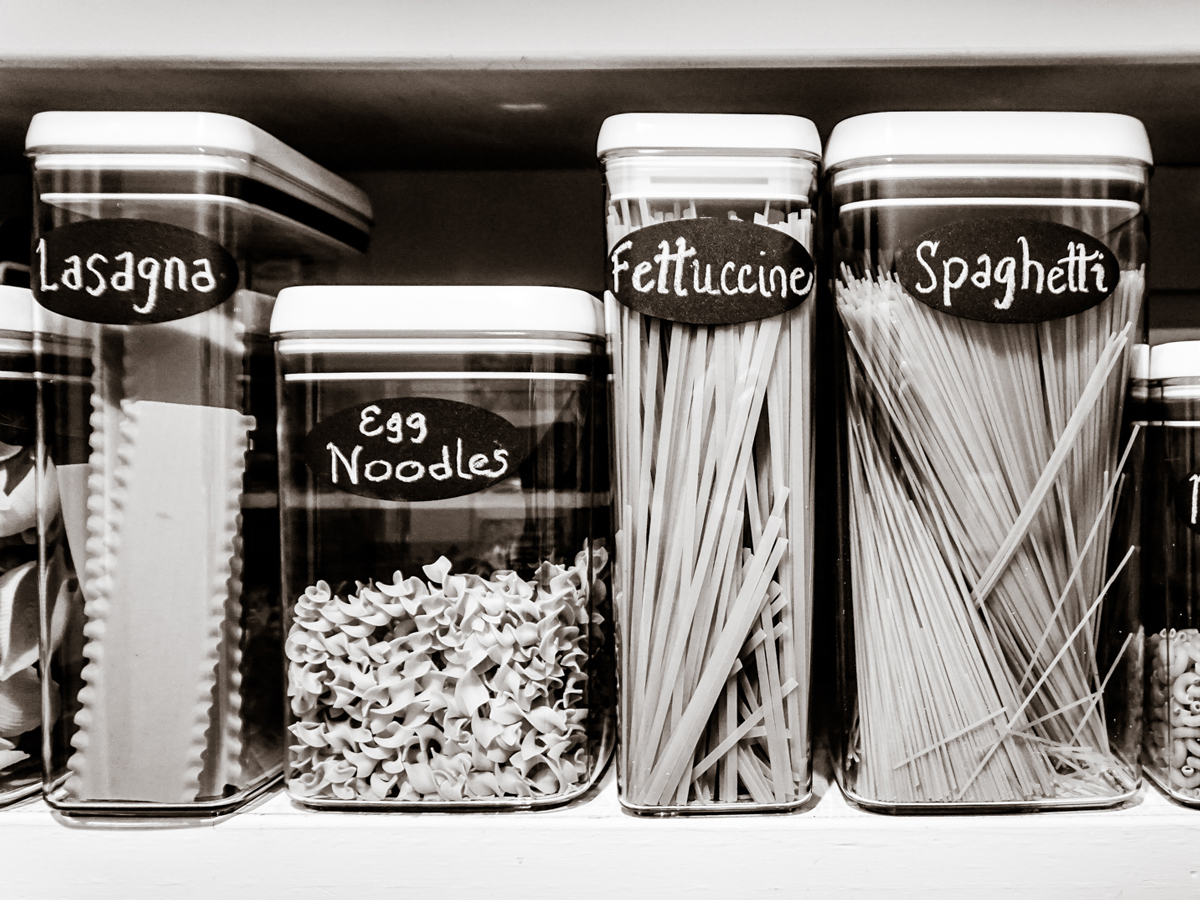
Just like the pasta containers, you need folders with meaningful labels to organize the photos on your hard drive, as well as in Lightroom, or wherever else you store them. Piles of those cryptic file names are nearly useless for quick retrieval. “20221110_162430” can be deciphered as a picture taken on November 10, 2022, but I have no idea what the rest represents. Do you? Let’s put an end to that.
YOUR HARD DRIVE. I’m a PC user--no judgment. Your Windows system came installed with a “pantry” under Documents called Pictures. We will build “shelves”--folders--for our pantry and then make “storage containers”--subfolders-- to place on them. Finally, we will fill the containers with pasta…I mean photos!
I’m going to assume you know nothing about making folders. Follow along with the diagrams below. Mac people, interpret as necessary.
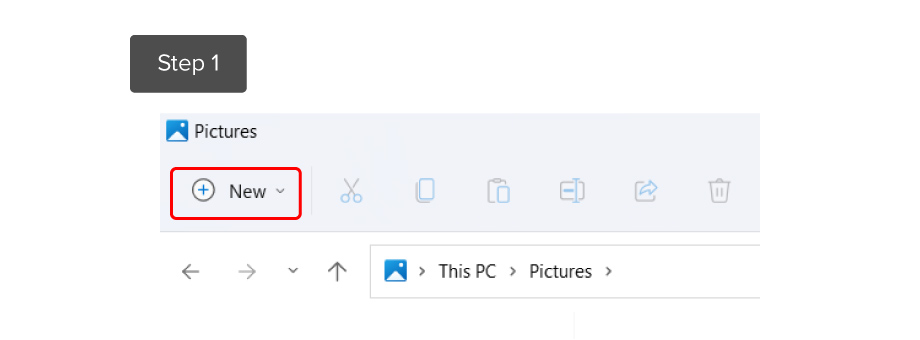
- Find the little + New button at the top left in the toolbar.
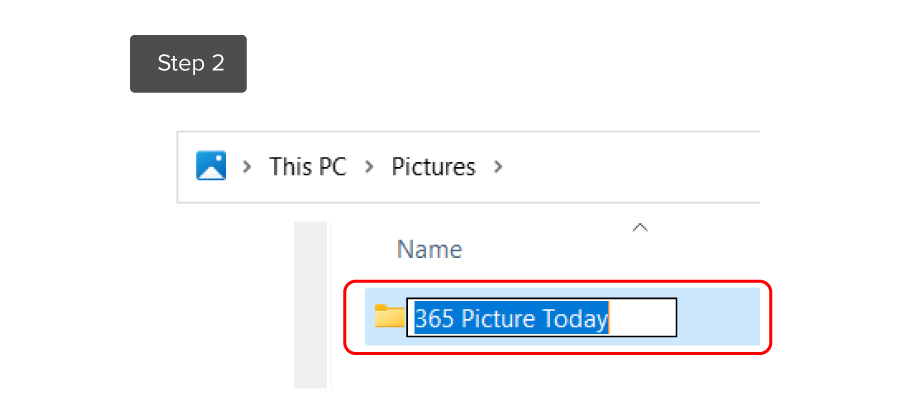
- Click on it and create a folder labeling it 365 Picture Today. Starting your folder with the number 365 will keep it at or near the top of your alphabetized folders. You now have a “shelf" for everything 365, past, present, and future.
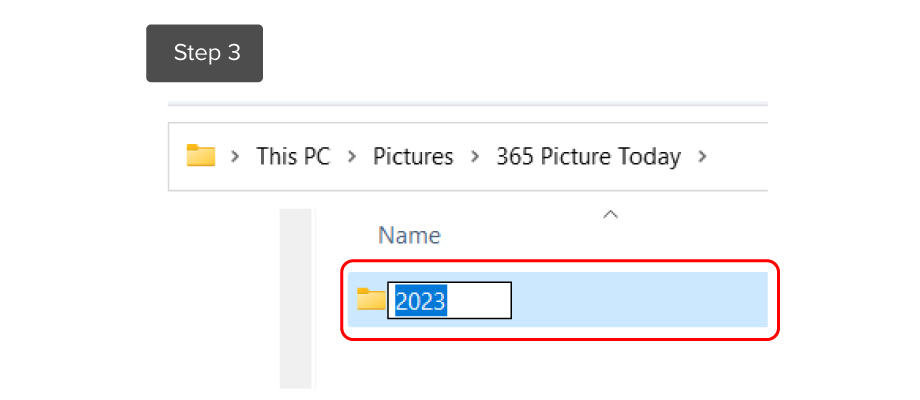
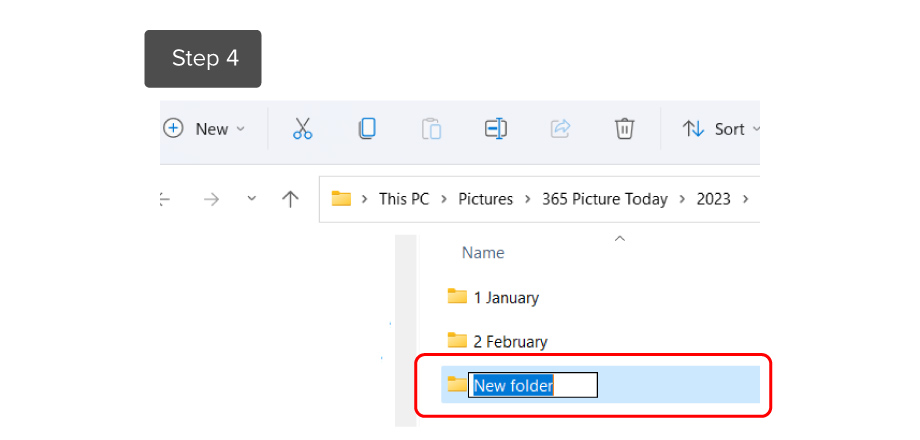
- Double-click on 365 Picture Today. It will open to an empty folder. Go back to + New and create the folder 2023. If you begin your folder’s name with the year, subsequent years will fall numerically beneath it. That will make finding a particular year easy.
- Double-click on your 2023 folder and create your folders for every month, following the same steps of clicking on + New. These are your “containers” that will hold the photos. Label them 1 January, 2 February, etc. right through 12 December. Without any numbers, your computer will default to alphabetizing, so April will precede January. You can override it, but why make more work? You can add other folders inside 2023 for related projects such as quarterly challenges, monthly themes, or whatever is important to you.
FILL ’ER UP
Every time you select your Photo Of The Day for posting whether from Lightroom, your phone, Google Photos, or wherever, download it to the correct month's folder. Add copies to other folders like quarterly challenges, but always add one to your monthly folder. They are now ready for collages, slide shows, photo books, cards, calendars, etc.
You can create folders outside of “365,” too. I have a “Family” folder, a “Selfie” folder for profile pics, and my “2024 Calendar” to receive images for next year’s gifts…or commercial ventures!
If you’ve made your folders--go, you! If you don’t use Lightroom, you can quit here or skip to the bottom for info about using Google Photos!
LET YOUR LITTLE LIGHTROOM SHINE
Redundancy Is Good. Your photos should be stored in at least 3 places: your hard drive, an external hard drive, and a cloud source like Google Photos or Lightroom. Then, barring nuclear annihilation, your precious art will survive a catastrophe like a computer crash.
Let’s look at Lightroom. If you’re not using Lightroom’s filing features, you are not getting your money’s worth. LR’s system involves Folders and Albums. Let me make one thing clear. Folders do not hold photos. Only Albums hold photos! Folders are for holding Albums, just like shelves are for holding containers of pasta. (If you use Lightroom Classic, albums are called Collections.)
You will create a similar system in LR as you did on your hard drive: a master 365 folder, a subfolder for the year, and months within that. Follow the steps if this is new to you.
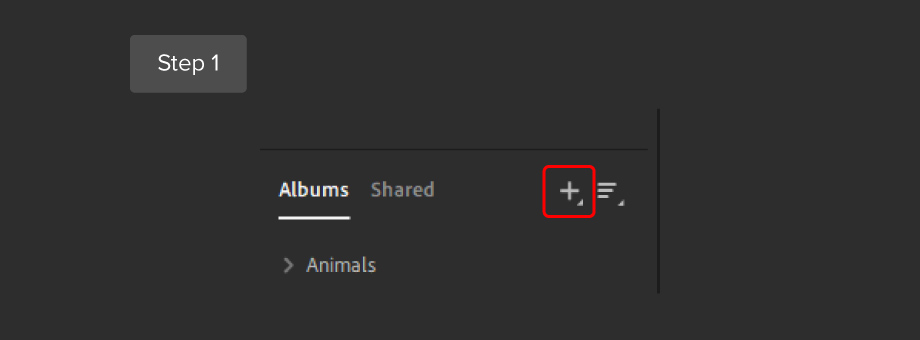
- Open Lightroom. In the far-left column, scroll down to the section ALBUMS.
Click the + to the right of ALBUMS. Choose Create Folder.
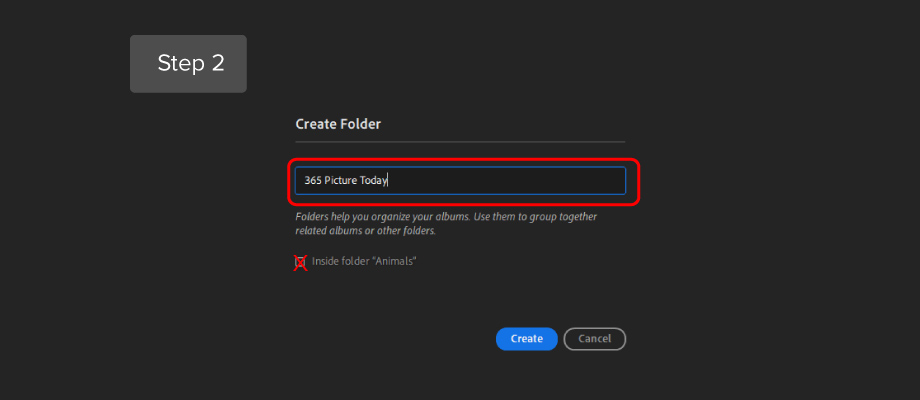
- A Create Folder window will open. Label the folder 365 Picture Today. Leave the little box unchecked. Click Create.
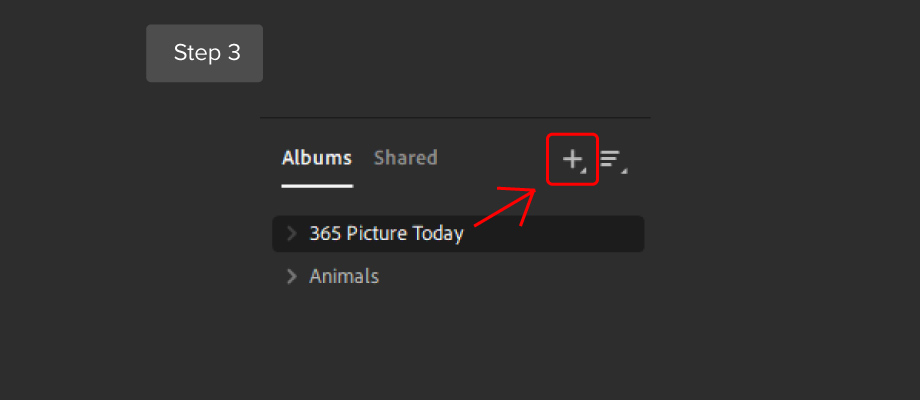
- Your 365 Picture Today folder will appear under ALBUMS. Click on the 365 Picture Today folder. A Window that says “This Folder Is Empty…Create Album” will appear. Ignore that!! Go back to the + and choose Create Folder for your year.
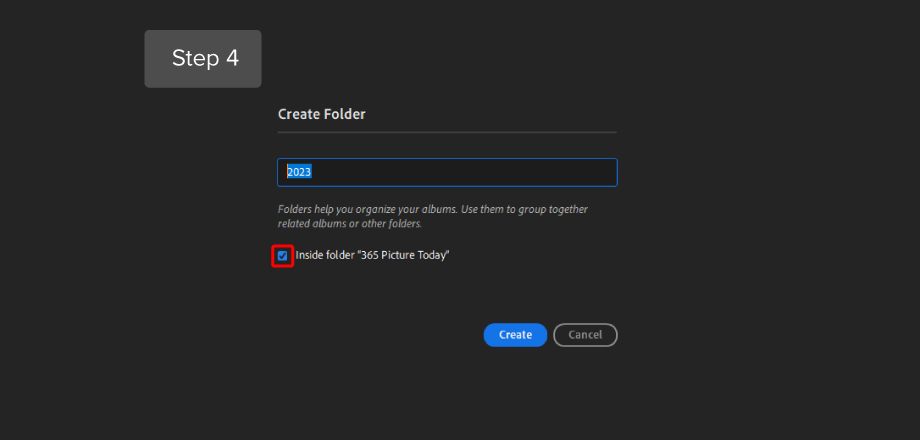
- Label it 2023. Leave the blue box checked that says “Inside folder 365 Picture Today Click Create.
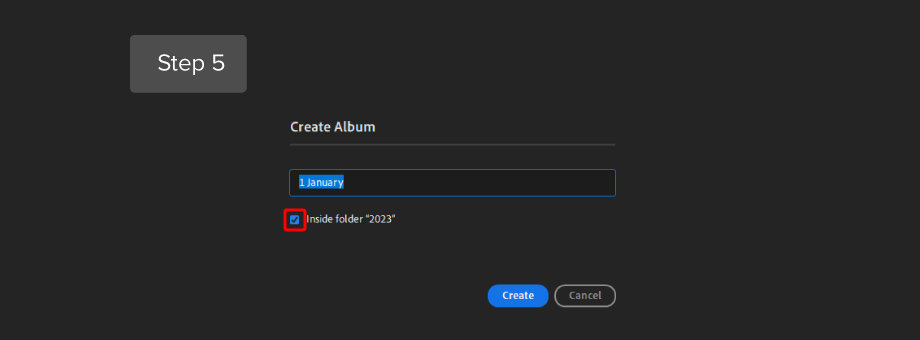
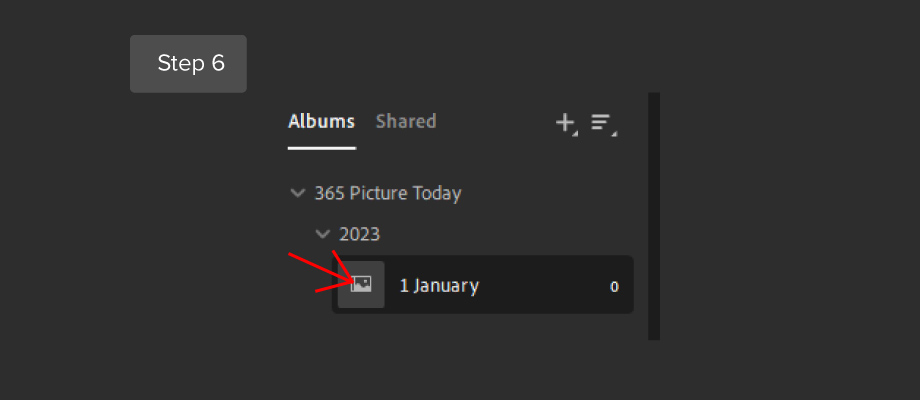
- The window “This Folder is Empty…” appears again. This time we WILL create an album to hold photos! Click on the Create Album button and label it 1 January. Make sure the little box is checked. Click Create. Your January album will appear on the left under your 2023 folder. Repeat these steps for every month.
- Finally, add photos! Click on your January album. A window with Add Photos will appear that allows you to add from your hard drive. Click on it and a window with photo files from your hard drive will appear. Click on your choice, then click Review for Import at the bottom of that window. It will appear in Lightroom. Click Add Item. It will now appear in your January album!
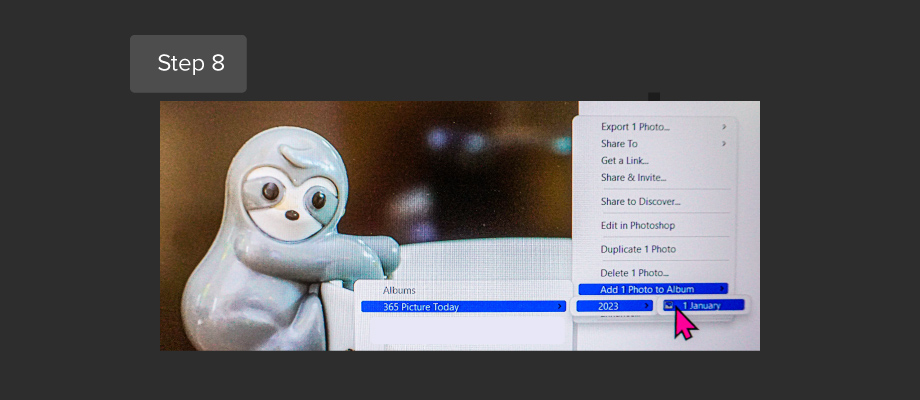
- OR you can add from your Lightroom photos. Open All Photos at the top of the lefthand column and select a photo. I’ve chosen a cute sloth on a mug.
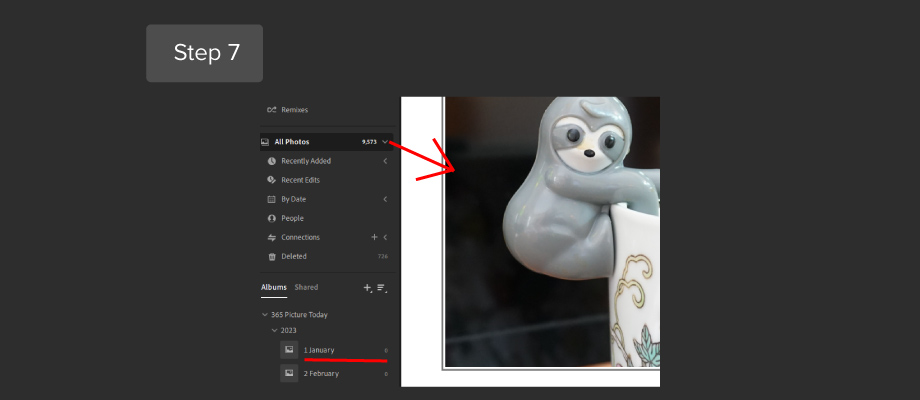
- Right-click on the photo. Hover on Add 1 Photo to Album at the bottom of the list. Slide your pointer to the 365 Picture Today folder, then slide over to the 2023 folder, and finally to the month. Click on 1 January.
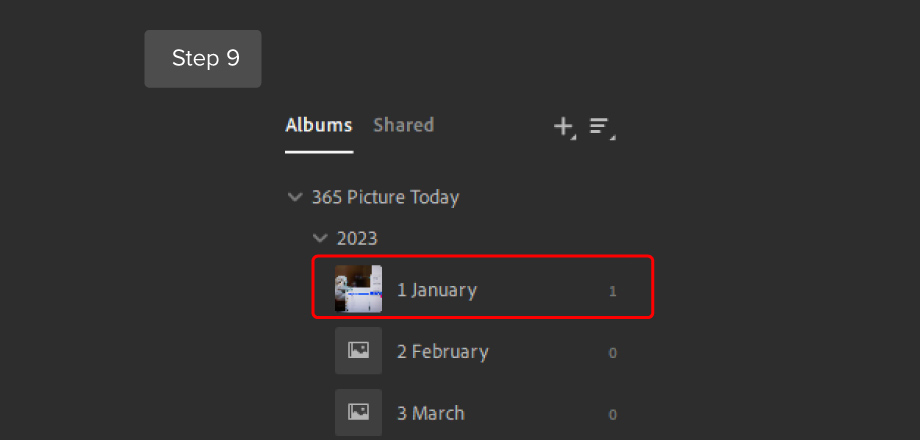
- In your January folder in the left column is--ta-da!--a tiny thumbnail of your photo! LR is also keeping track of the number of photos in your month. When you click on the month’s album, all the photos within will be displayed.
GOOGLE PHOTOS: YOU GET WHAT YOU PAY FOR
GPhotos is free-ish and a great compromise if you’re not ready for LR’s monthly fee. However, it comes with organizational drawbacks. You can create individual albums labeled “365…” by year and month, but not folders and subfolders. And their organization options are limited. Arranging “A to Z” means adding punctuation at the beginning of the title to control the alphabetization. Annoying. You can arrange albums by “Last Modified,” but if you add a photo to some other album, that one will now be the first on your list. It’s quite messy. Sad face. If you have solutions, let’s hear them!
MAKING MARTHA STEWART - AND ME - PROUD
Your photo pantry looks great! All your see-through containers are labeled and ready to go. Just like a storage makeover, you can now find any photo you want and more importantly fast ! You’ve made a huge commitment to 365 days of posting pictures, so you deserve to reap the benefits. I hope to see your Fav Photo from 2023 next December. And I hope it only takes 5 minutes to post it!
Do you have photo organization tips to share? Drop a comment and help everyone out!